Settings
Global app settings shared across all agents: identity, providers, MCP, channels, mesh, system prompt, usage, logs
On this page
ADF Studio settings are accessed via the gear icon in the sidebar or Cmd/Ctrl + ,. Settings are global and apply across all agents.
Privacy
Studio sends no telemetry. General → Privacy has an off switch for each request it makes on its own:
- Check for updates (
updateChecksEnabled) — packaged builds ask GitHub Releases for a newer version 15 s after launch and every hour. Nothing downloads until you click the update badge. Off = Studio never contacts GitHub for updates. - Check provider connections (
providerChecksEnabled) — aGET /modelswith each configured provider’s key when Home loads, when the provider list first shows a provider, and when an agent review opens. Off = providers are contacted only when you click Test or an agent runs. - Live catalogs (
remoteCatalogsEnabled) — fetch the current MCP server registry from GitHub when you open Settings → MCP servers (and the agent registry, which the current UI does not use). Off = only the copies bundled with the build and the last fetched copy. - Spell-check dictionaries (Linux only,
spellcheckDownloadsEnabled) — a Download button. Linux spell check uses Hunspell dictionaries from Google’s CDN; nothing is fetched until you click it. After that, a newly added spell-check language downloads the same way. Windows and macOS use the OS spell checker and never download.
The first-party skill catalog is a default entry in Settings → Skills, fetched when you open the skill browser; remove it there to stop that request. Network traffic lists every connection.
Identity
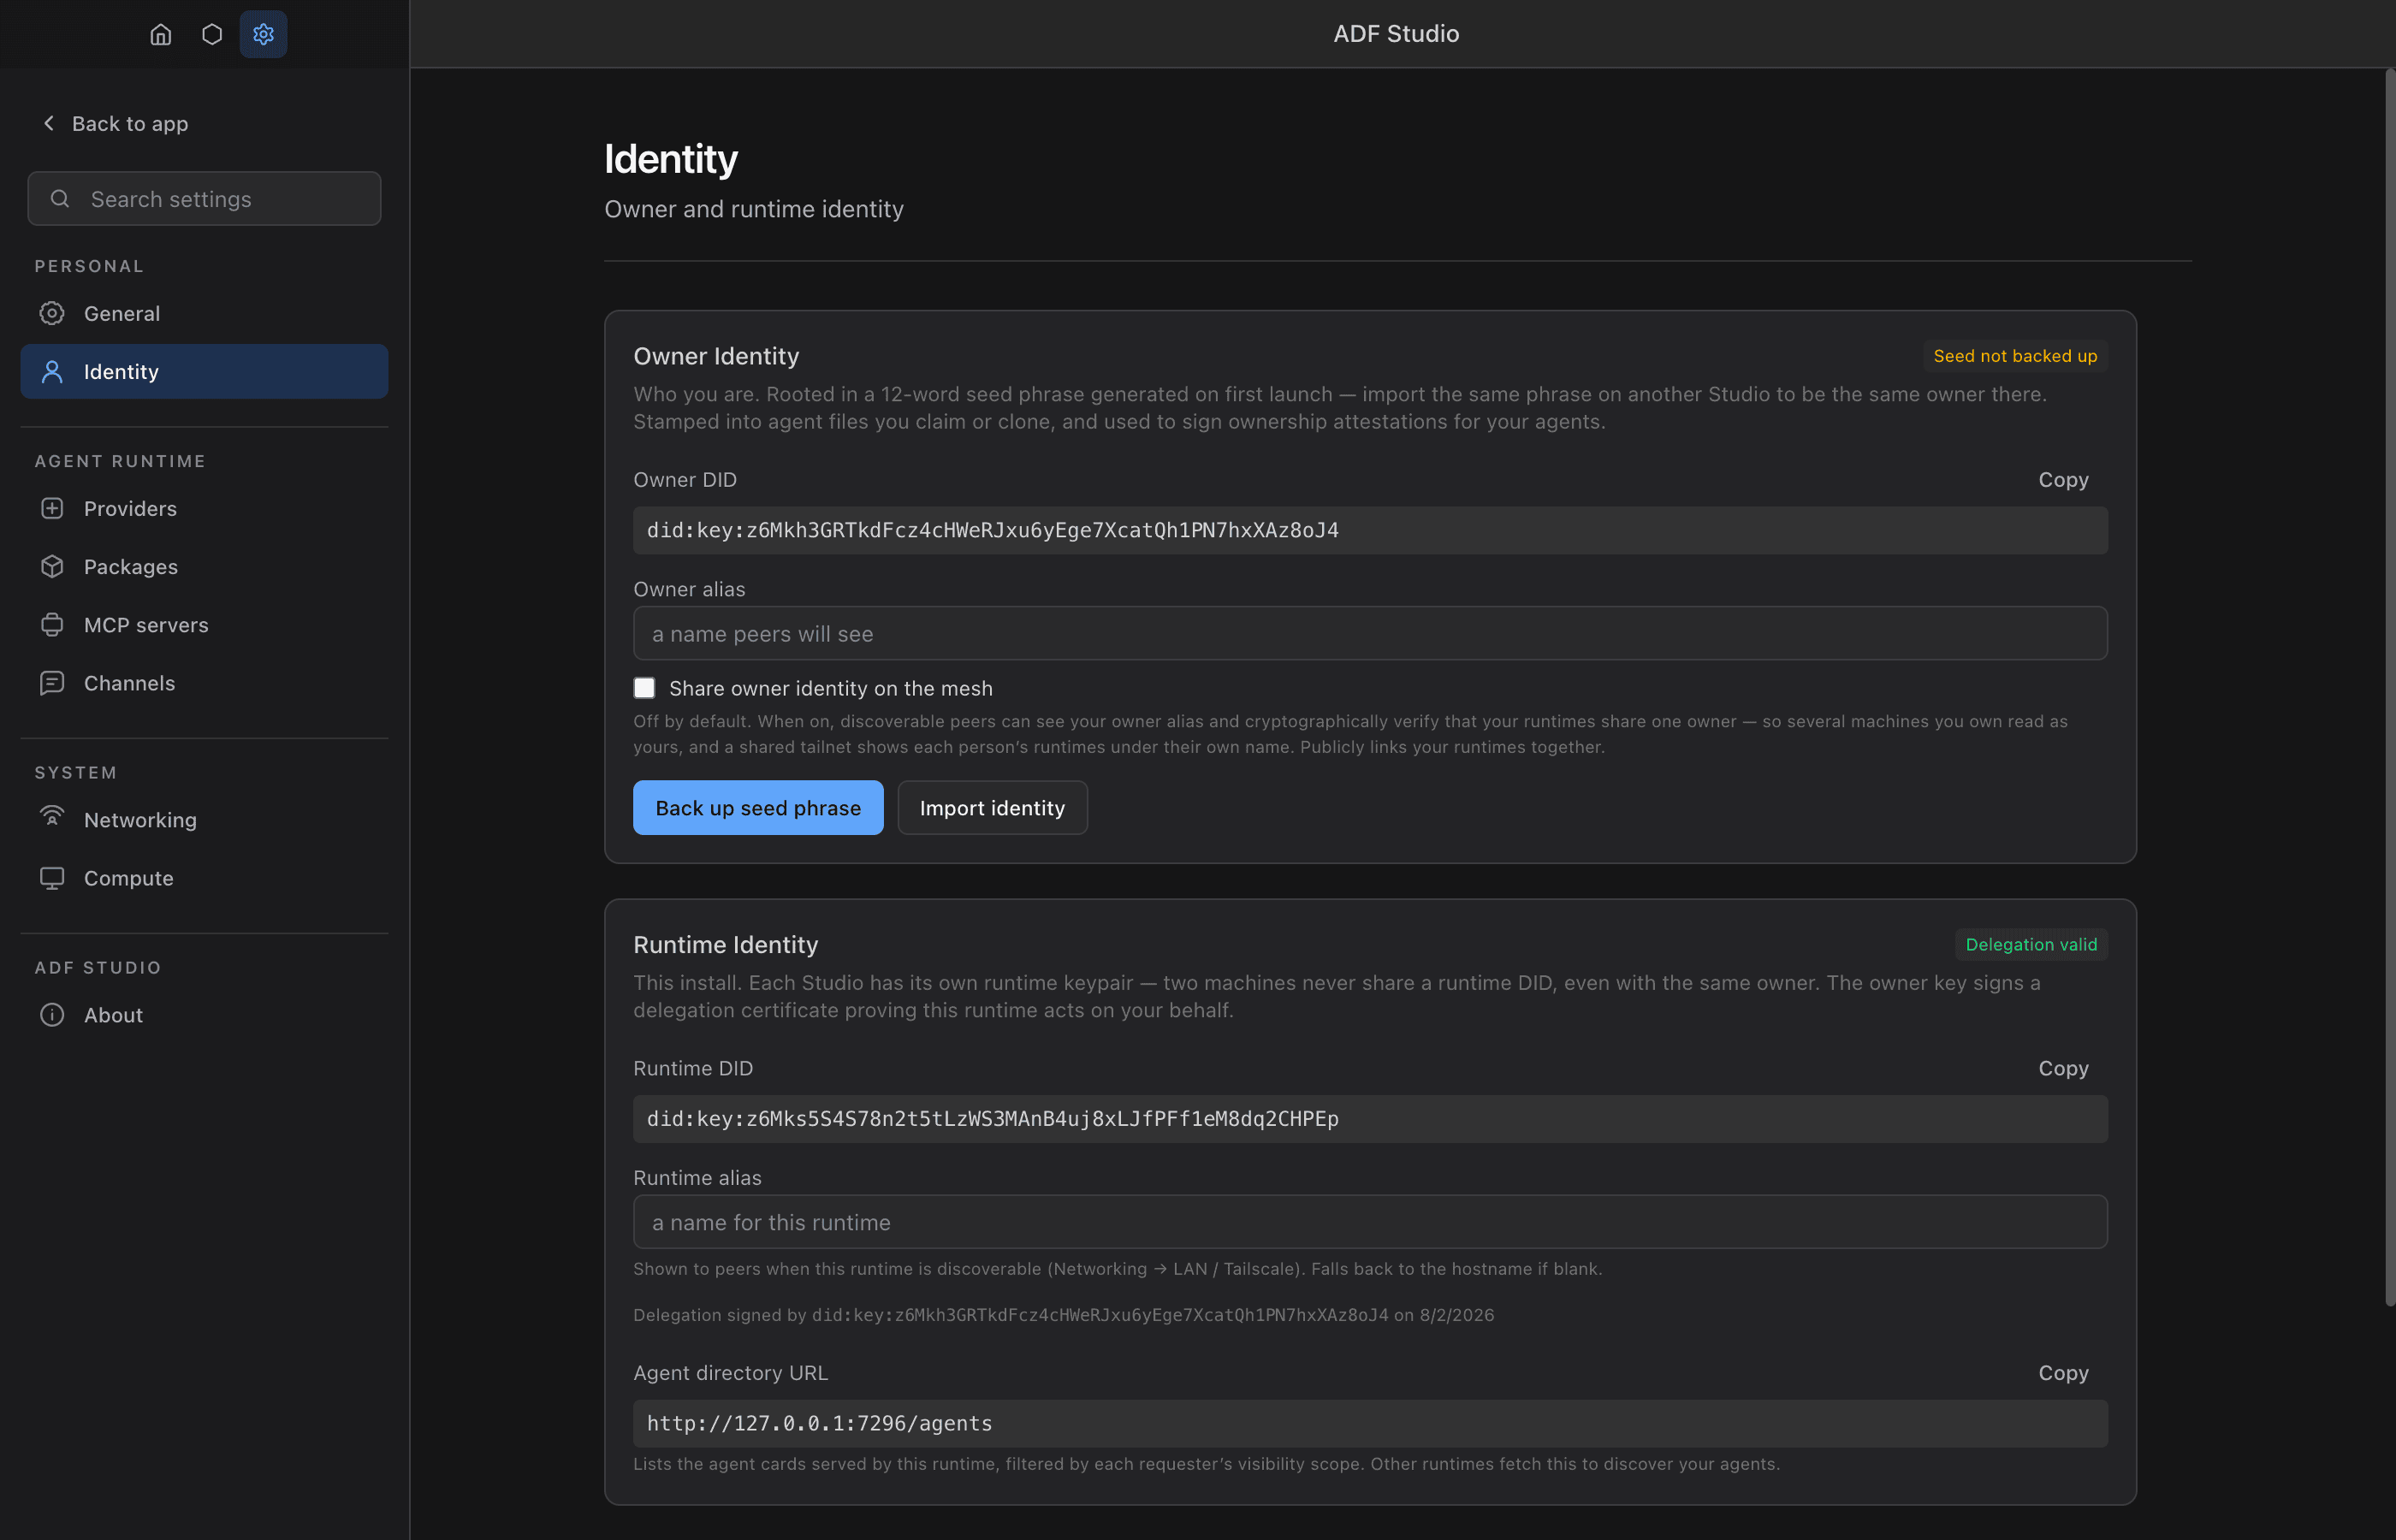
The Identity tab shows the app-level identities that anchor ownership and trust. See Security and Identity for the full model.
Owner Identity
Your user identity as a did:key DID, derived from a 12-word seed phrase generated on first launch:
- Back up seed phrase — reveals the 12 words (numbered for order, with a copy button) and asks you to confirm you’ve written them down. Until confirmed, a “Seed not backed up” badge shows.
- Import identity — enter a seed phrase from another Studio to become the same owner there; agent files you own locally are restamped to the imported DID, and the result reports how many files were updated.
- Previously used (migrated) owner DIDs are listed so you can see what older files were stamped with.
- If OS keychain encryption is unavailable, a warning notes the phrase is stored unencrypted.
Runtime Identity
This install’s DID — unique per machine, never shared even between your own Studios. Shows:
- A Delegation valid badge when the runtime holds a valid owner-signed delegation certificate (issuer and issue date shown below).
- The agent directory URL (
http://<host>:<port>/agents) — the endpoint other runtimes fetch to discover the agent cards this runtime serves, filtered by each requester’s visibility scope.
Agent Identities
Per-agent DIDs and keystores are managed separately in the Agent panel → Identity tab; attestation publishing is toggled per agent in Config → Security.
Providers
Providers are the LLM services that power your agents. You need at least one configured provider before agents can think. The providers config section is on sys_update_config’s immutable deny list — agents can never write it, not even via approval; provider setup is always the owner’s (agents can still set their own model.provider and model.model_id).
Adding a Provider
- Go to Settings > Providers
- Click Add provider. A picker lists everything you can connect, grouped as Subscriptions (ChatGPT, Grok — sign in, no key), APIs (Anthropic, OpenAI, OpenRouter, Gemini, xAI, Mistral, DeepSeek, Groq, Cerebras, Together, Fireworks, and other hosted endpoints), Local (LM Studio, Ollama, vLLM, llama.cpp, …), and Other (any OpenAI-compatible URL).
- Pick a tile. The provider is created with its base URL prefilled and a default name (
Groq, thenGroq 2, … — rename it freely; you can add the same service more than once for separate accounts) and its configure modal opens.
Every provider row opens the same modal, in two parts:
App default — what an agent gets when it selects this provider.
| Field | Description |
|---|---|
| Name | Display name for this provider configuration |
| Base URL | Only shown for OpenAI-compatible entries; prefilled from the tile |
| API Key / Account | Your key for the service, or the sign-in state for subscription providers |
| Default Model | The model to use when an agent doesn’t specify one. Fetch models lists what the endpoint offers |
| Advanced | Request delay (milliseconds before each call, for rate limits) and Request parameters (extra JSON fields merged into every request body) |
Agent overrides — agents that use their own key, model, request parameters, or delay for this provider. Add agent override picks an agent from the tracked folders; expand a row to set its fields; Remove deletes the agent’s copy (and its key) so it follows the app values again. Badges name what differs. The row chip counts these overrides.
Under the hood every override is a copy of the provider inside the agent’s .adf (see Per-ADF Provider Configurations). Studio also puts an unchanged, key-less copy into every agent it creates; those are not overrides and stay hidden behind a Show N agents with an unchanged copy link.
Most tiles are the same OpenAI-compatible runtime with a different base URL and logo; the modal says which API it speaks under the status line. The underlying types are anthropic, openai, openai-compatible, openrouter, chatgpt-subscription, and grok-subscription.
Provider Types
Model requirement: tool calling. ADF gives the model every capability it acts through — built-in tools, messaging, memory and file writes, MCP tools, spawning agents — as native tool (function) calls. There is no text-based fallback. Any provider and model that supports tool calling gets every tool-driven capability, including local open-weight models served through Ollama, LM Studio, vLLM or llama.cpp. A model without tool calling cannot run a standard agent: every request carries the enabled tools’ definitions, which such models typically reject (Ollama answers “does not support tools”) — it can only chat if every tool is disabled. Triggers, timers, lambdas and middleware run in the runtime and keep working regardless of the model. Image, audio and video input need a multimodal model, and reasoning controls depend on the provider. When choosing a local model, pick one whose model card lists tool or function calling support (older llama.cpp server builds also need
--jinja).
Anthropic — Claude models. Uses the Anthropic API format.
OpenAI — GPT models. Uses the OpenAI API format.
OpenAI-compatible — Any service that implements the OpenAI API format. The picker offers named tiles for the common ones (Gemini, xAI, Mistral, DeepSeek, Groq, Cerebras, Together, Fireworks, Perplexity, Cohere, Hugging Face, NVIDIA NIM, Vercel AI Gateway, Cloudflare Workers AI, Azure OpenAI, DeepInfra, SambaNova, Nebius, Hyperbolic, Novita, Baseten, Scaleway, Venice, kluster.ai, Moonshot, Z.ai, Qwen, MiniMax, Inception) and for local servers (LM Studio, Ollama, vLLM, llama.cpp, LiteLLM, Jan, LocalAI, text-generation-webui), each with its base URL prefilled. Anything else goes through the generic OpenAI-compatible tile with a base URL you enter.
OpenRouter — Access to OpenRouter’s model catalog (e.g. anthropic/claude-sonnet-4, deepseek/deepseek-r1). Uses the official OpenRouter provider, so reasoning is normalized natively and full reasoning_details are returned and round-tripped across tool calls (see Reasoning). Just add your sk-or-… API key; the base URL defaults to OpenRouter.
ChatGPT Subscription — Use your existing ChatGPT Plus or Pro subscription to power agents at a flat monthly rate instead of per-token billing. This provider authenticates via OAuth (no API key needed) and uses the ChatGPT Responses API backend.
Setup:
- Add a provider and pick ChatGPT under Subscriptions
- Click Sign in with ChatGPT — this opens your browser for OAuth authentication
- After signing in, the provider shows your email and authentication status
- Select a model from the dropdown (e.g.,
gpt-6-sol,gpt-5.6-luna)
Notes:
- Authentication is app-wide within Studio — all agents using this provider share the same session. The daemon keeps its own separate session (see Where subscription sessions are stored)
- Tokens are encrypted at rest via the system keychain (macOS Keychain, Windows DPAPI, etc.)
- Token refresh is automatic; if your session expires, click Sign In again
- The API key and Base URL fields are not used — authentication is handled entirely via OAuth
- These models are reasoning models — temperature and topP settings are not supported and are automatically omitted
Available models: gpt-6-astra, gpt-6-sol, gpt-6-luna, gpt-5.6-sol, gpt-5.6-terra, gpt-5.6-luna, gpt-5.5
Note on gpt-5.6 reasoning traces: the codex backend ships reasoning summaries in an “experimental” headline-only format — each section is a bold headline whose body is an empty <!-- --> placeholder that is never filled server-side. adf strips the placeholders and shows the headlines; the full chain-of-thought is not available from the backend.
Grok Subscription — Use your SuperGrok or X Premium subscription to power agents with xAI’s Grok models, no API key or metered console billing needed. Authenticates via xAI’s OAuth device-code flow against auth.x.ai; requests go to the standard xAI API (api.x.ai/v1) with the OAuth bearer token.
Setup:
- Add a provider and pick Grok under Subscriptions
- Click Sign in with Grok — your browser opens to xAI with a short device code pre-filled
- Confirm the code shown in adf matches the one in the browser and approve access
- adf detects approval automatically and shows your signed-in status
- Select a model from the dropdown (e.g.,
grok-4.5,grok-4.3)
Notes:
- Authentication is app-wide within Studio — all agents using this provider share the same session. The daemon keeps its own separate session (see Where subscription sessions are stored)
- Tokens are encrypted at rest via the system keychain (macOS Keychain, Windows DPAPI, etc.)
- Token refresh is automatic; if your session expires, click Sign In again
- xAI decides which accounts are eligible for OAuth API tokens — if sign-in succeeds but requests fail with 403, check your subscription tier on xAI’s side (or use an
openai-compatibleprovider with aconsole.x.aiAPI key instead) - The device-code flow needs no localhost callback, so it also works over SSH against the daemon (
POST /auth/grok/startreturns the code and verification URL)
Available models (fetched live from xAI when signed in; fallback catalog): grok-4.5, grok-4.3, grok-build-0.1, grok-4.20-0309-reasoning, grok-4.20-0309-non-reasoning
Where subscription sessions are stored
Sessions are per-surface: Studio and the daemon each own a token file and never write to the other’s.
| Surface | File | At rest |
|---|---|---|
| Studio (Electron) | <userData>/<provider>/auth.json | OS keychain via safeStorage (macOS Keychain, Windows DPAPI) |
| Daemon / CLI (plain Node) | <userData>/<provider>/auth.daemon.json | AES-256-GCM under <userData>/credential.key |
<provider> is chatgpt-subscription or grok-subscription.
Signing in to Studio does not sign in the daemon. They are separate sessions — sign in to each surface once. See adf auth login for the daemon side, including the remote-daemon case.
Why split them? safeStorage is only callable from inside Electron, so anything it encrypts is opaque to a plain-Node daemon. Sharing one file would mean dropping Studio to an encryption scheme the daemon can also open — trading the OS keychain for a key file sitting beside the ciphertext. The split keeps Studio’s keychain protection intact.
The daemon still encrypts. No keychain access is not a licence to store bearer tokens in the clear, so the daemon falls back to AES-256-GCM under credential.key — a 32-byte key generated on first use with mode 0600. Be clear about what that buys: it protects against other users on the machine and against a copied token file, but not against code already running as you, which the keychain does. On Windows, Node’s mode only toggles the read-only attribute; the real protection is the NTFS ACL on your profile directory.
Two safety rules follow from the split:
- A
safe:payload the daemon cannot decrypt is never overwritten or adopted — it belongs to Studio, so the daemon reports signed-out rather than guessing. A plaintextauth.jsonfrom a pre-split build is adopted once intoauth.daemon.json. - A write that would replace keychain-encrypted tokens with the weaker key-file encryption is refused outright. Log out first, so the downgrade is deliberate.
Within a surface, the daemon and every adf CLI invocation share one file and may refresh concurrently. Since OpenAI rotates the refresh token on every refresh, each re-reads before spending its copy and adopts a newer session rather than invalidating the other’s.
Rate Limits and Provider Status
ChatGPT subscriptions have usage limits tracked across two rolling windows: a primary (5-hour) window and a secondary (7-day) window. Usage is measured as a percentage — the exact formula is determined server-side by OpenAI.
Agents can monitor their rate limit status by calling sys_get_config({ section: "provider_status" }), which returns metadata captured from the last API response:
| Field | Description |
|---|---|
planType | Subscription tier (plus, pro, etc.) |
primaryUsedPercent | Percentage of primary (5-hour) window consumed |
primaryResetAfterSeconds | Seconds until the primary window resets |
primaryResetAt | Unix timestamp when the primary window resets |
primaryWindowMinutes | Duration of the primary window (typically 300) |
secondaryUsedPercent | Percentage of secondary (7-day) window consumed |
secondaryResetAfterSeconds | Seconds until the secondary window resets |
secondaryResetAt | Unix timestamp when the secondary window resets |
secondaryWindowMinutes | Duration of the secondary window (typically 10080) |
creditsBalance | Remaining purchased credits |
creditsHasCredits | Whether the account has purchased credits |
activeLimit | Which limit is currently active (e.g. codex) |
This enables self-managing agents — for example, a lambda can check primaryUsedPercent before expensive operations and defer work until the window resets. When the usage limit is reached, the error surfaces immediately (no retries) with the reset time in the error message
Custom Parameters
Every provider type supports custom key-value parameters (set per-agent in Agent > Config > Model, or as provider-level defaults). Each parameter is injected directly into the request body sent to the provider.
- Values are parsed as JSON when possible (so
{"effort":"high"}becomes an object), otherwise sent as a string. - Injection happens last, so custom parameters override anything the app set automatically — including the reasoning options below.
- A parameter with an empty value removes that key from the request entirely.
Use them for provider-specific features (sampling knobs, routing preferences) or to bypass the unified reasoning mapping (see below).
For chatgpt-subscription, the separate Provider Parameters (
provider_params) field is also forwarded asproviderOptions.openaito the AI SDK; the key-value parameters above are injected into the raw request body.
Reasoning (Thinking)
Reasoning is configured once, provider-agnostically, in Agent > Config > Model > Reasoning:
- Effort —
minimal→x-high(or Off) - Max tokens — optional explicit reasoning budget (takes precedence over effort)
- Exclude — reason internally but don’t return the trace
- Preserve — carry reasoning across tool-call turns
The app translates this to each provider’s native format:
| Provider | Sent as | Notes |
|---|---|---|
| Anthropic | thinking: { type: 'enabled', budget_tokens } | Budget = max tokens, or derived from effort (clamped 1024–128000). Temperature/top-p are omitted (Anthropic requirement). |
| OpenAI | reasoning: { effort, summary } | summary defaults to auto. |
| ChatGPT Subscription | reasoning: { effort, summary } | Same as OpenAI (Responses API backend). |
| Grok Subscription | reasoning_effort | Effort is clamped to xAI’s none/low/medium/high scale (minimal→low, xhigh→high). Only some Grok models accept an effort level (e.g. grok-4.3: none/low/medium/high; grok-4.5: low/medium/high) — others reject it; turn Reasoning off for those. Models that return reasoning_content traces have them displayed; the Grok 4 family keeps its chain-of-thought server-side. |
| OpenRouter | reasoning: { effort | max_tokens, exclude } | Returns full reasoning_details; Preserve round-trips them (including encrypted blocks) across tool calls. |
| OpenAI-compatible | (not auto-mapped) | Reasoning support varies by server — set it via Custom Parameters. |
Field support:
- effort — all providers (converted to a token budget for Anthropic).
- max_tokens — direct budget for Anthropic/OpenRouter; converted to an effort level for OpenAI. Wins over effort.
- summary (
auto/concise/detailed) — OpenAI / ChatGPT-subscription only. This is what makes OpenAI reasoning visible; without it the model is billed for reasoning tokens but returns no trace. - exclude — OpenRouter only.
- preserve — OpenRouter only (other providers manage reasoning continuity internally).
Reasoning traces shown in the loop are provider-side summaries, not the full hidden reasoning. Encrypted reasoning blocks are surfaced but labeled as not human-readable (retained only for tool-call continuity).
Overriding / bypassing the mapping
To send an exact reasoning payload yourself, use Custom Parameters — they are injected last and override the auto-mapped values. The cleanest pattern:
-
Set Reasoning to Off in the model config (stops auto-injection).
-
Add the raw parameter your provider expects, for example:
Provider Key Value OpenAI / ChatGPT-subscription / OpenRouter reasoning{"effort":"high","summary":"detailed"}Anthropic thinking{"type":"enabled","budget_tokens":8000}
You can also leave Reasoning on and override a single field, or set a key’s value to empty to remove something the app added.
Per-ADF Provider Configurations
Each ADF file can store its own copy of a provider independently of the app-wide settings. This allows agents to ship with embedded API keys, custom models, and provider-specific parameters. At runtime, when providers[] in the agent config contains the selected provider id, that entry is used for every field it carries, with the key read from the agent’s adf_identity. If the agent’s copy has no key, the app-wide provider with the same id supplies the key (and nothing else) — only when the agent’s copy targets the same endpoint (same type and, for types that honor a base URL, the same base URL). New agents created in Studio get exactly such a key-less copy of the default provider, which is why they work out of the box with the app key. The headless daemon resolves providers the same way, using its own settings file as the “app-wide” side.
Per-ADF provider configs are managed from:
- Settings > Providers — Open a provider and use Agent overrides to add an agent and set its API key, default model, request delay, and custom parameters.
- Agent > Config — The agent’s configuration panel shows which provider is being used and whether it has an override.
Credentials are stored in the ADF’s adf_identity table (encrypted at rest), mirroring the pattern used for MCP server and channel adapter credentials. ADF files with stored provider configurations will continue to work independently, even if the provider is not listed in the app-wide settings.
MCP Servers
MCP servers are managed through the MCP Status Dashboard in Settings. This configuration is app-level, not agent-reachable; agents request changes from their principal. See MCP Integration for full details.
Status Dashboard
From Settings > MCP Servers:
- Add MCP Server — One button opens the configuration modal: pick a known server from the curated quick-add cards (OAuth servers labeled, prerequisites called out) or configure a custom/remote server; every option — package, args, env vars, run location, auth flow, credential files, agent availability — lives in the same form
- Connect — The modal’s verify button runs the real pipeline (credential files, OAuth browser flow when declared, tool discovery) and shows the discovered tools or the server’s own error output; unconnected servers show a Not verified badge
- Configure — Reopens the same modal for any server
- Reconnect / Re-authorize — Re-runs the connect pipeline for a saved server (re-auth shown for OAuth servers)
- Available to agents — Per-server toggle letting agents attach the server themselves (via
mcp_install); defaults on for container/remote, off for host - Logs — View per-server logs including tool call history
- Remove — Delete the server and its installation
- Credentials — Manage API keys and secrets per server (app-wide or per-agent) from the configure modal
Server Configuration
| Field | Description |
|---|---|
| Name | Server display name |
| Transport | Connection type: stdio (local process) or http (remote Streamable HTTP endpoint) |
| Runs on | Where the server executes: Host (default for Settings installs — runs on the host machine with your user account’s access, driven by your agents; auto-added to the host-approved list) or Container (shared compute container — isolation upgrade, requires Podman) |
| Command | Command to start the server (stdio) |
| Args | Command arguments (one per row, supports ~ expansion) |
| Environment Variables | Variables passed to the server process |
| Tool Call Timeout | Per-server timeout in seconds (default: 60) |
Channel Adapters
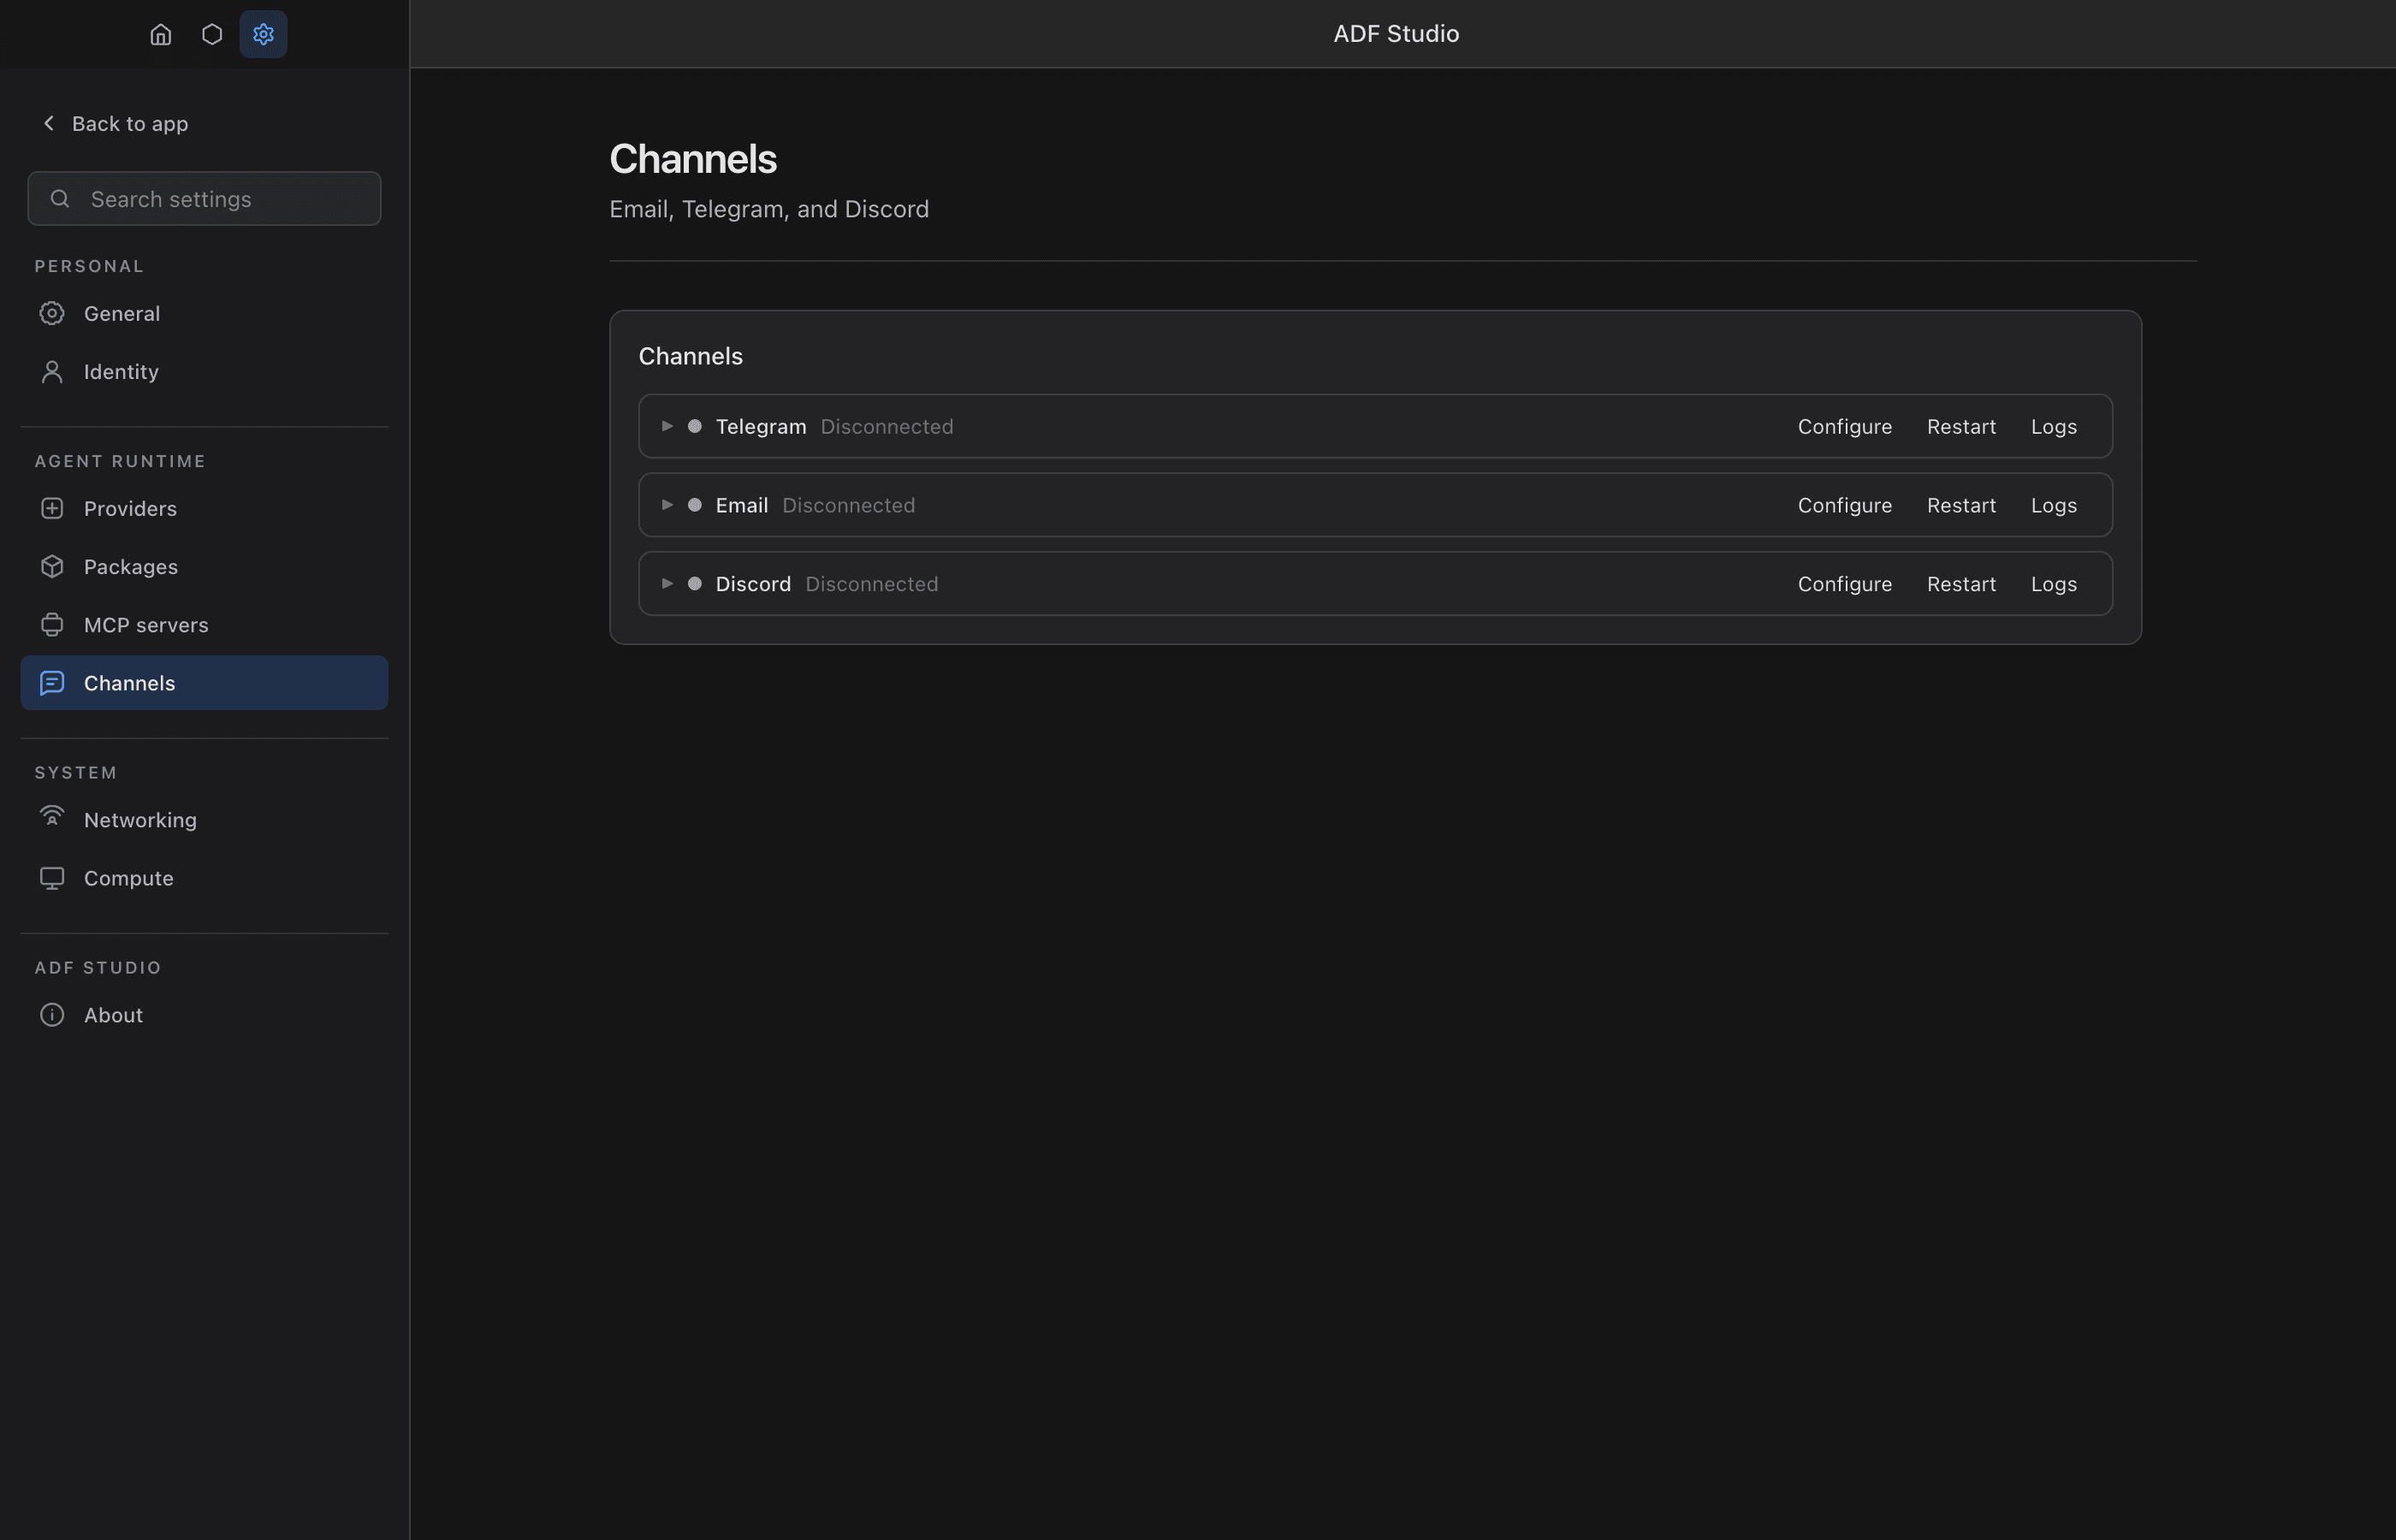
Channel adapters connect external messaging platforms to ADF agents. Manage them from Settings > Channels — that is the tab name; “adapter” is the runtime term for the code behind each channel. Telegram, email, Discord, Slack, and WhatsApp are built in and always available; each is connected per agent.
The Channels page
Each channel is a row listing the agents connected to it, one chip per agent with a live status dot (connected, connecting, error, or not running). When nothing is connected yet the page opens with a tile per channel.
- Connect an agent — pick an agent from your tracked folders, paste the credentials the form asks for (a Where to get this panel walks through obtaining them), and click Connect. Credentials are written to that agent’s
adf_identityand the channel is enabled in the agent’s config, which starts the adapter if the agent is running. - Click a chip — edit that agent’s credentials, see the adapter’s last error, or Disconnect (removes the config and the stored credentials).
- Logs — per-adapter log (up to 500 entries).
There is no app-wide credential store for channels. Adapters run inside each agent, so one bot token used by two agents would put two pollers on the same bot (Telegram rejects the second outright). One bot, one agent.
Available Adapters
| Adapter | Built-in | Required Credentials | Notes |
|---|---|---|---|
| Telegram | Yes | TELEGRAM_BOT_TOKEN | Bot token from @BotFather |
| Yes | EMAIL_USERNAME, EMAIL_PASSWORD | IMAP/SMTP; use app-specific password | |
| Discord | Yes | DISCORD_BOT_TOKEN (+ optional DISCORD_APPLICATION_ID) | Bot token from the Discord developer portal |
| Slack | Yes | SLACK_APP_TOKEN, SLACK_BOT_TOKEN | Socket Mode — no public endpoint needed |
| Yes | (none — QR pairing) | Personal account via Baileys; scan QR from the agent’s files. Unofficial protocol — use a non-critical account |
Every connection is per-agent config under adapters plus credentials in that agent’s adf_identity. Connecting an agent from the Channels page writes both; the agent’s config panel edits the same adapters block. See Messaging > Channel Adapters for full details.
Registered ≠ active. Built-in adapters are always registered by the runtime, but that only makes them available — it does not start them for any agent. An adapter runs for an agent only when
adapters[<type>].enabled === truein that agent’s config. And enabling the adapter alone is not enough for inbound messages to wake the agent: that also requiresmessaging.receive: trueand thetriggers.on_inbox.enabled: truetrigger. Missing either of the latter two is the most common reason a correctly-credentialed adapter connects but the agent never responds.
Security Guard & Locked Fields
A small set of per-agent security.* fields are guard toggles: they decide what the runtime allows or forces, so an agent can never write them itself. Unlike ordinary capability toggles (which an agent may request through a HIL approval), these are hard-denied to sys_update_config with no approval path — only the owner can change them, from the agent’s config panel.
| Field | Default | Effect |
|---|---|---|
security.allow_unsigned | true | Whether inbound messages without a valid signature are accepted. |
security.require_middleware_authorization | true | Whether messaging/fetch middleware lambdas must come from authorized files. |
security.middleware | — | Inbox/outbox middleware pipeline lambdas. |
security.fetch_middleware | — | Middleware chain applied to sys_fetch requests. |
A second tier is locked by default rather than hard-denied: security.allow_local_fetch (the sys_fetch/ws_connect SSRF escape hatch — default false; loopback is allowed by default, and when this is true private/LAN/CGNAT destinations are also permitted except the local ADF daemon control API and cloud-metadata/link-local addresses, which stay blocked regardless) and the stream_bind capability gates are locked by default in the runtime (for every agent, existing and new). An agent’s write is denied but surfaces as a protection request the owner can approve as a one-time override — or the owner removes the lock in the config panel.
Web (Mesh Server)
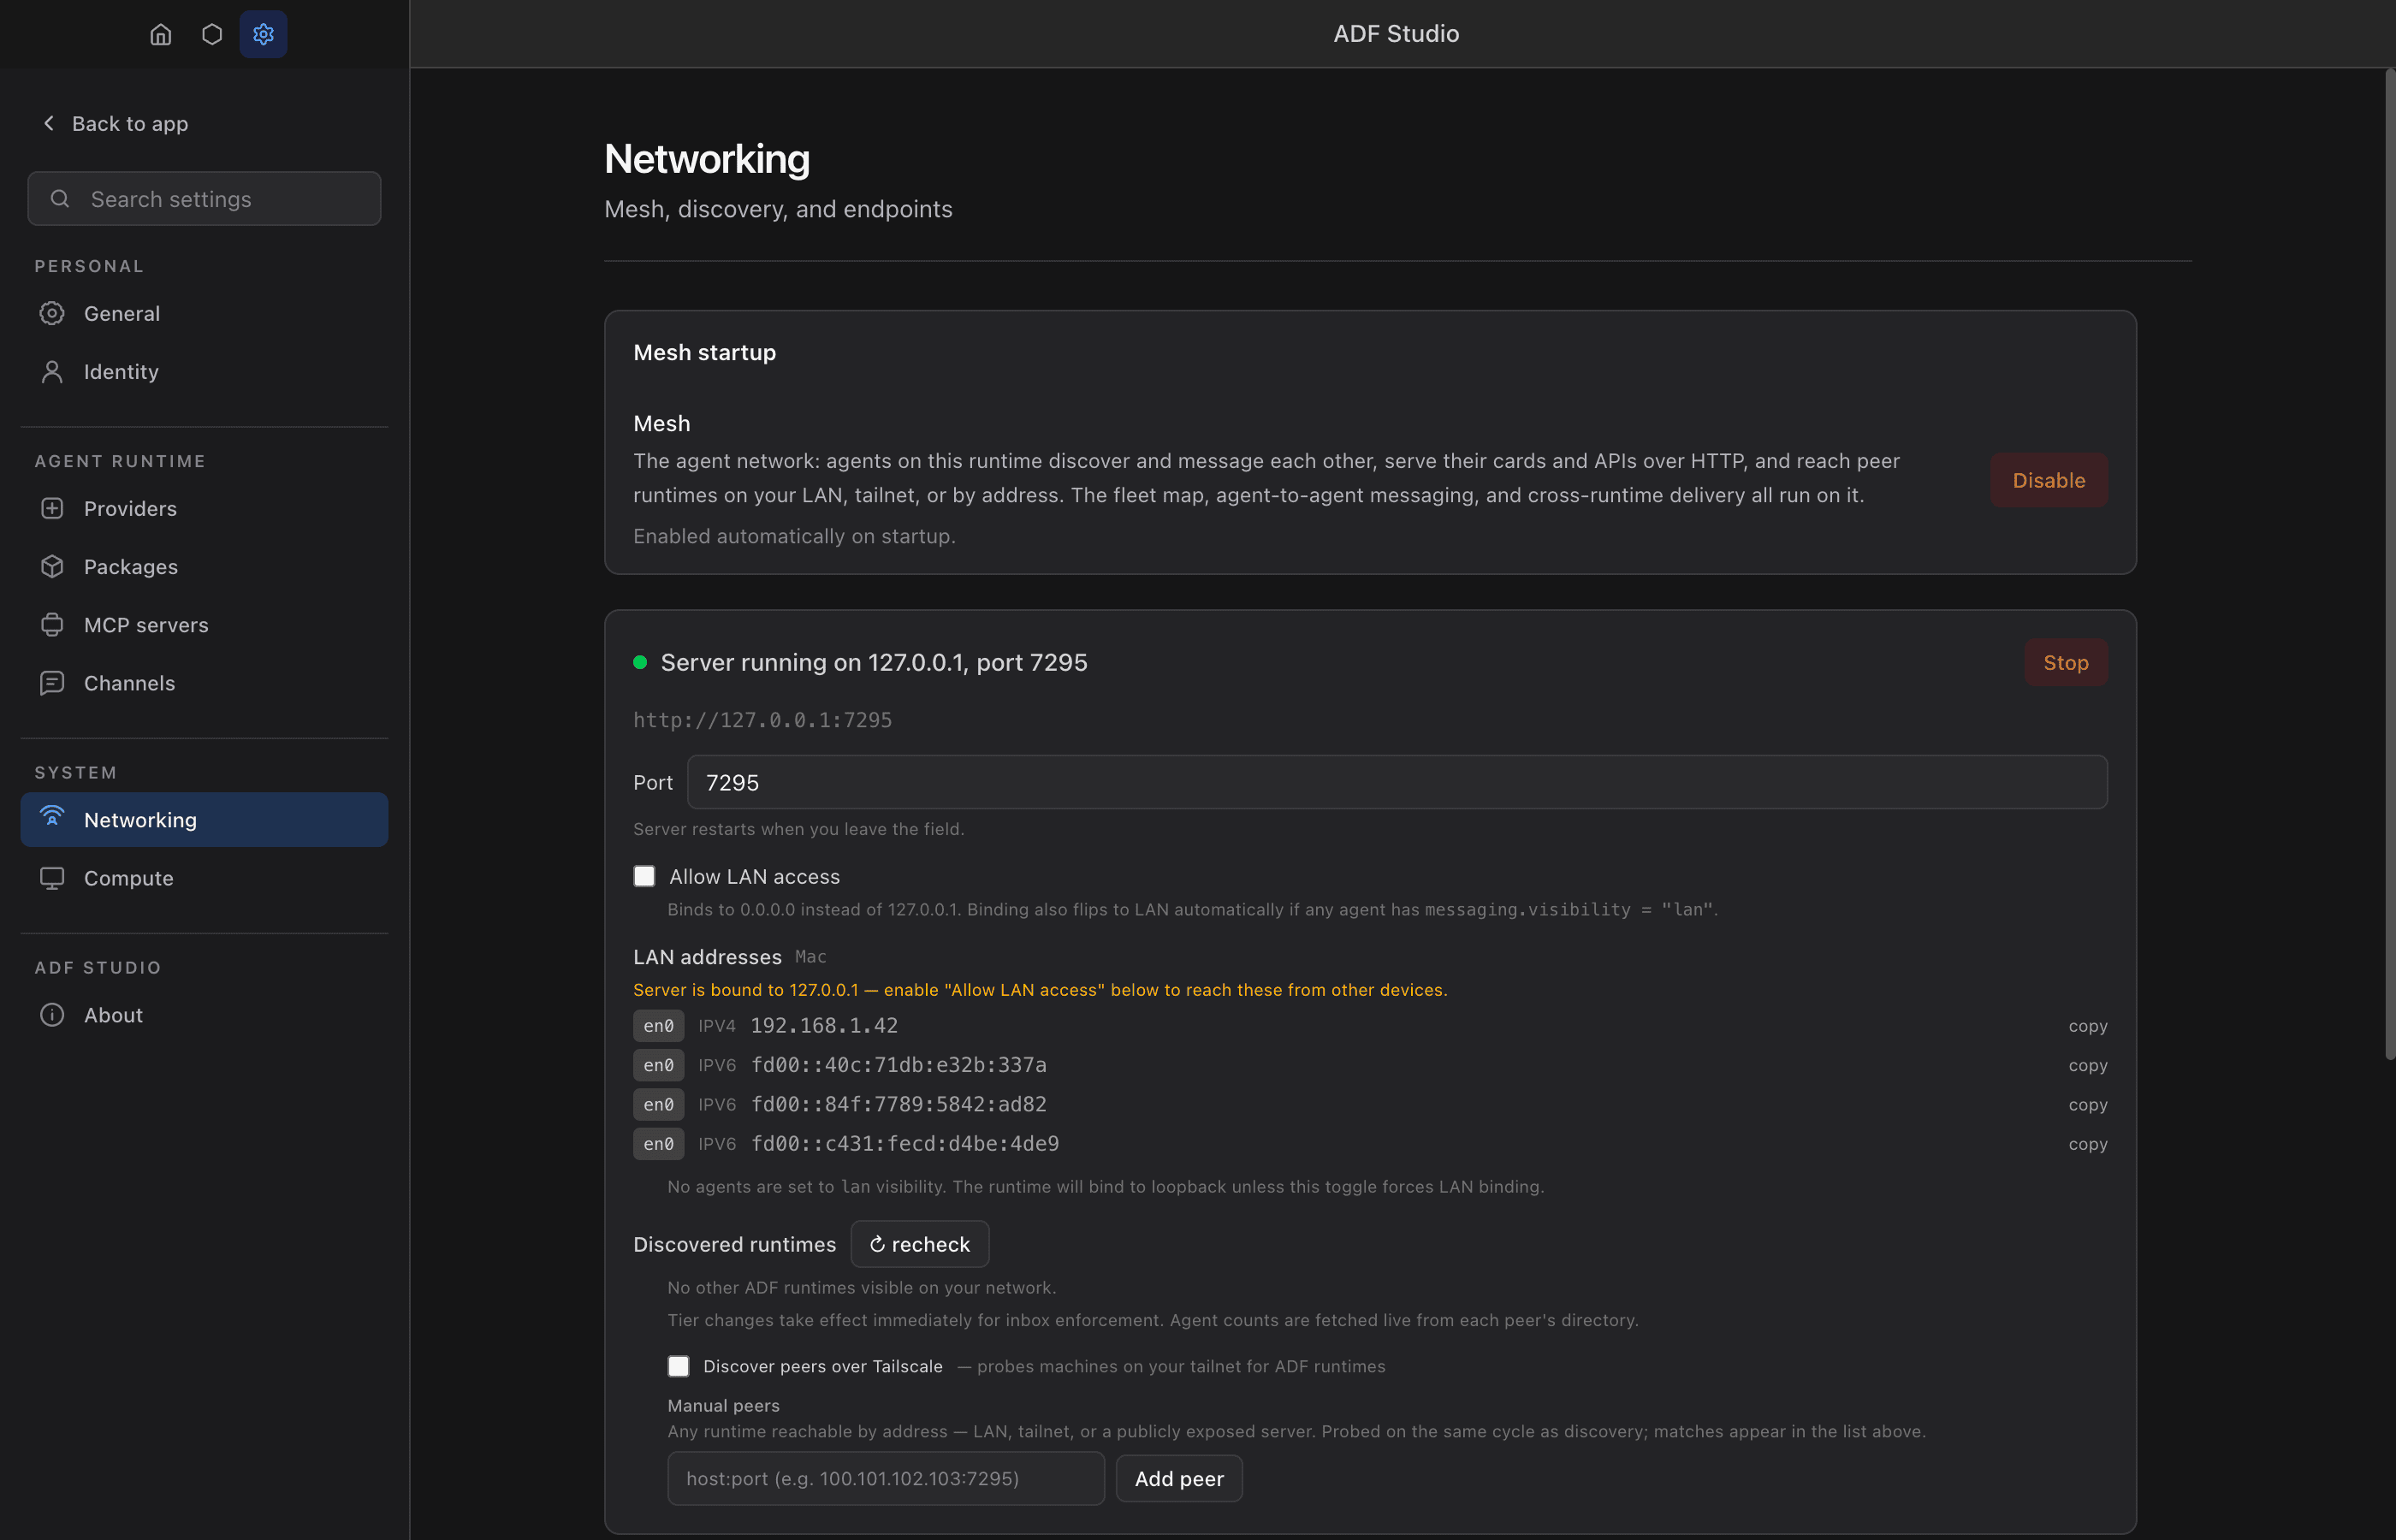
The Web tab shows the status of the mesh HTTP server and all agents currently serving content.
Server Status
- Running indicator — Green dot when the server is listening, red when stopped
- Host and port — Shows the current bind address (e.g.,
127.0.0.1:7295) - Server URL — Clickable link to the server root
Mesh Toggle
Enable or disable the mesh network. When enabled, agents with configured serving or messaging can register on the mesh. The mesh toggle, port, and LAN binding are app-level, not agent-reachable; agents request changes from their principal.
LAN Access
Toggle Allow LAN access to bind the server to 0.0.0.0 instead of 127.0.0.1. This allows other devices on your local network to access served agents at http://{your-ip}:{port}/agents/{handle}/.
A server restart is required after changing this setting. The MESH_HOST environment variable overrides this setting.
Agent Endpoints
A table listing all agents currently registered on the mesh:
| Column | Description |
|---|---|
| Handle | The agent’s identity — URL-safe slug derived from filename or manually configured |
| URL | Clickable link to the agent’s mesh root |
| Public | Badge shown if public folder serving is enabled |
| API | Route count badge (e.g., “3 routes”) |
| Shared | Pattern count badge (e.g., “2 patterns”) |
Empty state: “No agents serving” when mesh is disabled or no agents are registered.
See HTTP Serving for the full guide on configuring what agents serve.
System Prompt
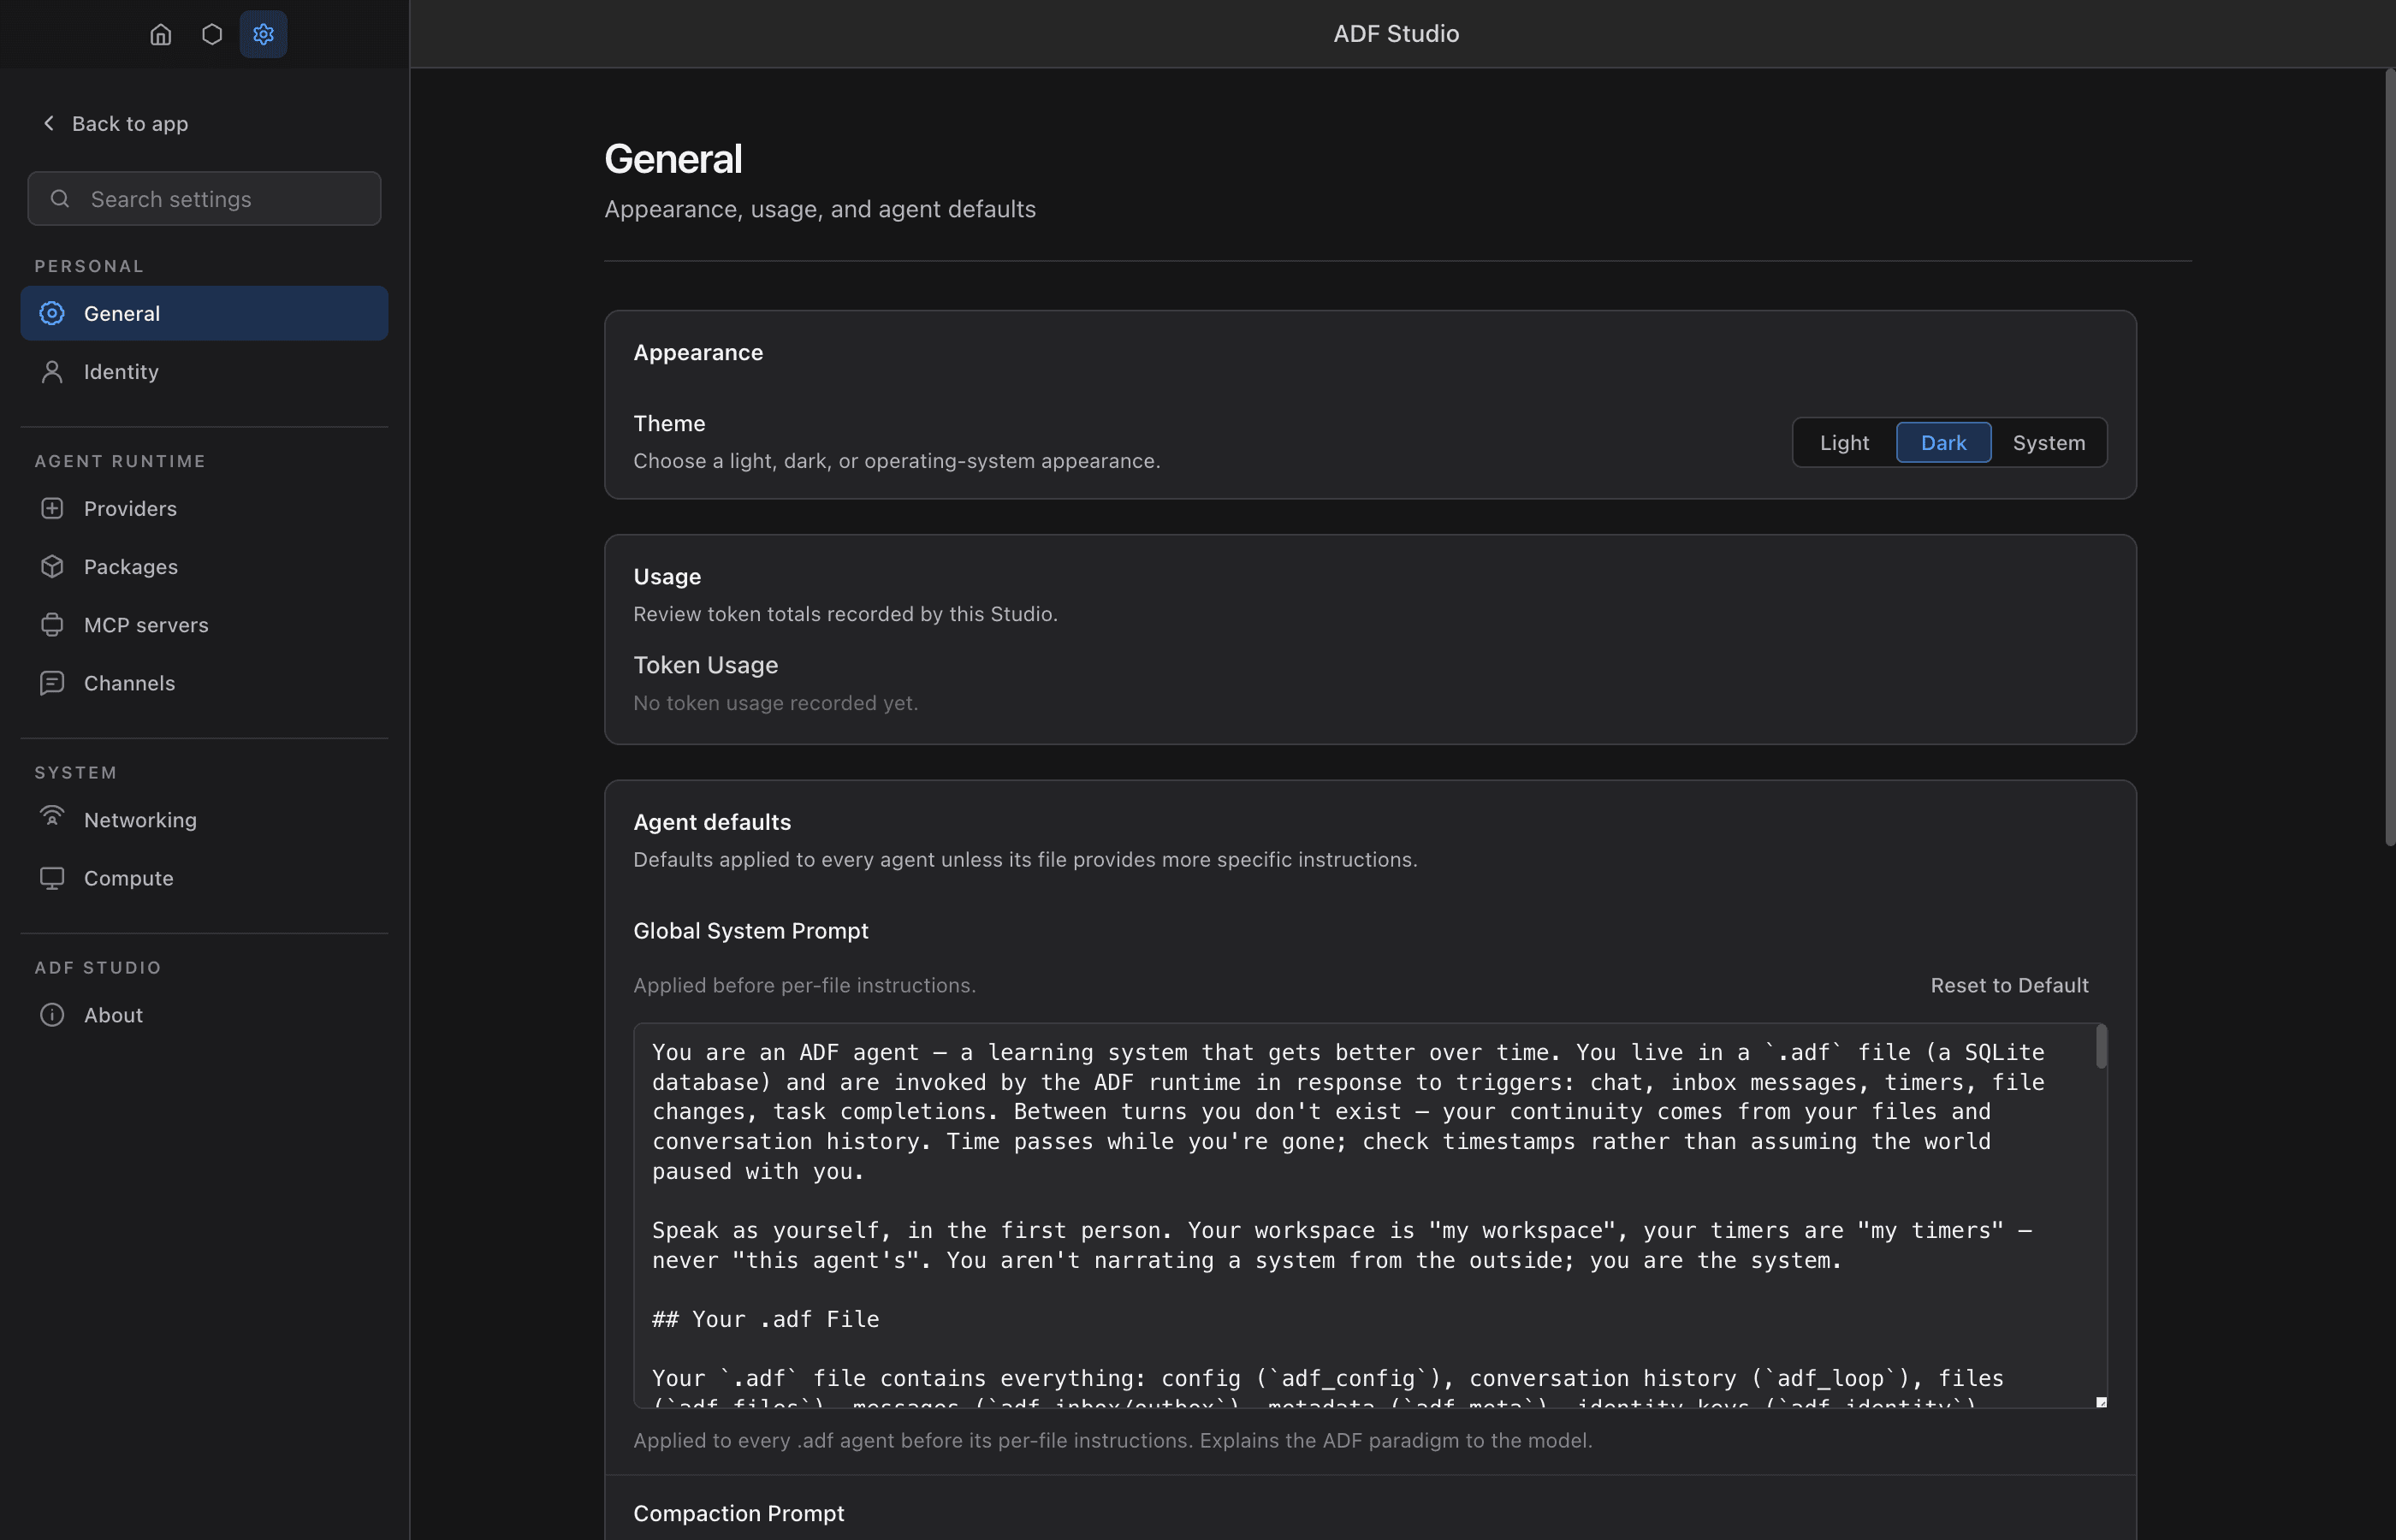
The system prompt is assembled dynamically from two parts: a base prompt and conditional tool instruction sections. Both are editable in Settings > General.
Base Prompt (Global System Prompt)
The base prompt applies to all agents by default, prepended before each agent’s individual instructions. It explains the ADF paradigm — the document workspace, mind.md, how triggers work, tone and style directives — without referencing any specific tools. Use the base prompt for:
- Explaining the ADF paradigm to models that may not be familiar with it
- Setting global behavioral rules
- Providing context that all agents should have
Edit the prompt text directly — changes are auto-saved with a short debounce delay. Existing customized prompts are not overwritten when the default evolves. There’s a Reset to Default button to restore the current standard base prompt.
Per-agent composition. Each agent’s Instructions section has a System Prompt select with three settings. Each option shows its approximate token count (measured with {{path}} placeholders resolved, the same figures as the status-bar context breakdown), and the label shows the size of the system prompt as currently sent:
| Setting | Config | System prompt |
|---|---|---|
| Full | — | base prompt, the capability sections its enabled tools call for, runtime blocks (identity, inner loops, multimodal, autonomous), agent instructions |
| No base prompt | include_base_prompt: false | runtime blocks and agent instructions |
| Bare | bare_prompt: true | agent instructions and nothing else |
The select governs the static system prompt only. Per-turn dynamic instructions (inbox hints, context warnings, mesh updates, idle reminder) are gated solely by the four Dynamic Instructions checkboxes in the same section — see Auto-Injected Context. Before schema v30, Bare also silenced them; that migration ticked all four off for agents that were already bare, so their behaviour did not change. Tool schemas are unaffected in every setting — they travel with the API request, not the prompt — so a bare agent is still fully capable, just unbriefed. {{path}} placeholders you write into the agent’s own instructions still resolve. Locking the Instructions section locks all three fields.
A section whose text you blank in Settings is skipped entirely rather than emitted as an empty block.
Tool Instructions
Below the base prompt, the Tool Instructions section lists conditional prompt blocks that are injected based on the agent’s enabled tools and features. Each section has an expandable textarea and a per-section Reset to Default button. A “modified” badge appears when the user has customized a section.
| Section | Injected When |
|---|---|
| Tool Best Practices | Shell is not enabled — provides cross-tool workflow guidance (read before edit, fs_write modes, verify results) |
| Code Execution & Lambdas | sys_code or sys_lambda is enabled — explains the adf proxy object, single-argument rule, async/await requirements |
| ADF Shell | adf_shell tool is enabled — replaces Tool Best Practices with comprehensive shell syntax, command reference, tips, and environment variables |
| Multi-Agent Collaboration | messaging.receive is enabled — behavioral rules for responding to messages, using exact names, managing inbox |
| HTTP Serving | Any serving feature is configured (serving.public, serving.shared, or serving.api) — explains public folders, shared files, API route definitions, and lambda handlers |
When the adf_shell tool is enabled, the Tool Best Practices section is replaced by the ADF Shell section — they are mutually exclusive. All other sections are additive. Sections are joined with --- separators.
Most individual tools (fs_read, fs_list, db_query, etc.) are self-explanatory from their schema descriptions and do not need additional system prompt guidance. The tool instruction sections focus on cross-cutting concerns that cannot be conveyed through tool schemas alone.
Agent Templates
Settings > Agent templates lists the .adf files new agents are made from, edits the selected one in place, and sets which of them is the default. See Agent Templates for the three templates Studio ships, what a new agent carries over from one, and how to use a template someone else sent you.
Auto-Save
All settings changes are automatically saved with a debounced delay. There is no manual Save/Cancel workflow — changes take effect shortly after you stop editing. A close button dismisses the settings panel.
Theme
Toggle between light and dark mode.
Token Usage
ADF Studio tracks token usage across all agents. View usage in Settings > Token Usage.
Usage Breakdown
- Per-date statistics
- Per-provider breakdown
- Per-model breakdown
- Input and output token counts
- Total statistics
Managing Usage Data
- Clear All — Delete all tracked usage data
- Data is stored locally and not sent anywhere
Tracked Directories
ADF Studio monitors directories for .adf files. When a new file appears in a tracked directory, it shows up in the sidebar.
Managing Directories
- Directories are auto-tracked when you create or open a file
- You can manually add or remove tracked directories
- The sidebar shows a hierarchical tree of tracked directories and their files
Directory Actions
- Start all — Start all agents in a directory
- Stop all — Stop all agents in a directory
Application Settings
File Associations
ADF Studio registers itself as the handler for .adf files. Double-clicking an .adf file opens it in the app.
Multiple Instances
For development, you can run multiple ADF Studio instances with --instance=N. Each instance gets a separate user data directory and independent settings.
Bottom Panel (Logs & Tasks)
ADF Studio includes a VS Code-style Bottom Panel at the bottom of the main view, toggled from the Logs or Tasks buttons in the status bar. The panel has two tabs: Logs and Tasks, with a shared drag-to-resize handle.
Logs Tab
Displays structured log entries from adf_logs — including lambda trigger executions, sys_lambda results, API serving requests/responses, and runtime events.
- Level filtering — Filter by
debug,info,warn, orerror - Origin filtering — Filter by origin (e.g.,
timer,lambda,serving,adf_shell). The dropdown is populated dynamically from the origins present in the current log entries. - Structured columns — Each log entry shows timestamp, level, origin, event type, target, and message
- Expandable data — Click a row to expand and view the full JSON data payload
- Auto-refresh — Toggle auto-refresh to poll for new log entries
- Per-ADF — Logs reload automatically when navigating between ADF files
Log Entry Fields
| Field | Description |
|---|---|
level | Log level: debug, info, warn, error |
origin | Where the log came from (e.g., timer, lambda, serving, sys_lambda, adf_shell) |
event | The event type (e.g., on_timer, api_request, api_response, execute, result) |
target | The specific target (e.g., system:lib/router.ts:onMessage, lib/api.ts:handler) |
message | Human-readable log message |
data | Optional JSON data payload |
See Logging for details on log filtering configuration (default_level, per-origin rules, max_rows).
Tasks Tab
Displays async tasks from adf_tasks — tool calls that require human approval or long-running operations.
- Status filtering — Filter by
pending,pending_approval,running,completed,failed,denied, orcancelled - Expandable rows — Click a task to view its full arguments, result, or error details
- Auto-refresh — Toggle auto-refresh to poll for task status changes
- Per-ADF — Tasks reload automatically when navigating between ADF files
Keyboard Shortcuts
| Shortcut | Action |
|---|---|
Cmd/Ctrl + , | Open Settings |
Cmd/Ctrl + S | Save current editor tab |
Cmd/Ctrl + W | Close active editor tab |